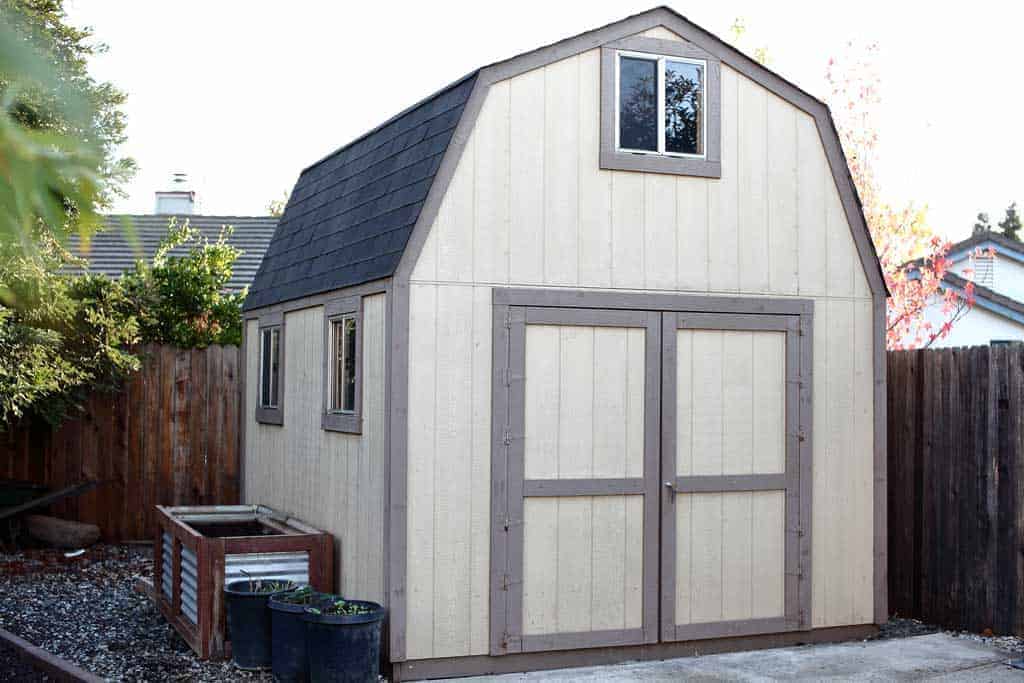
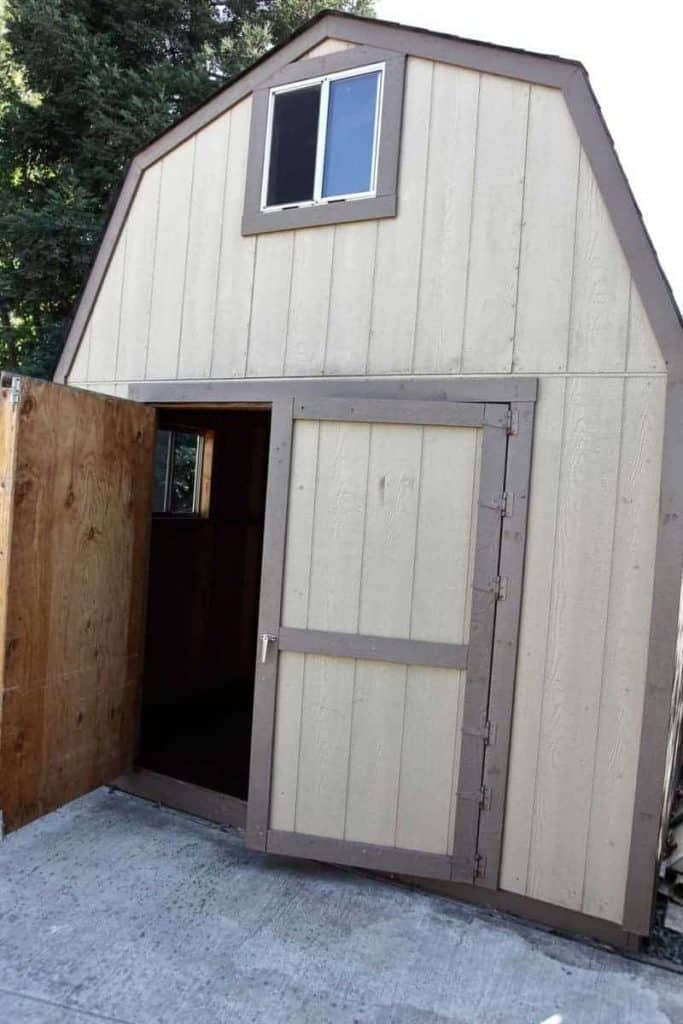
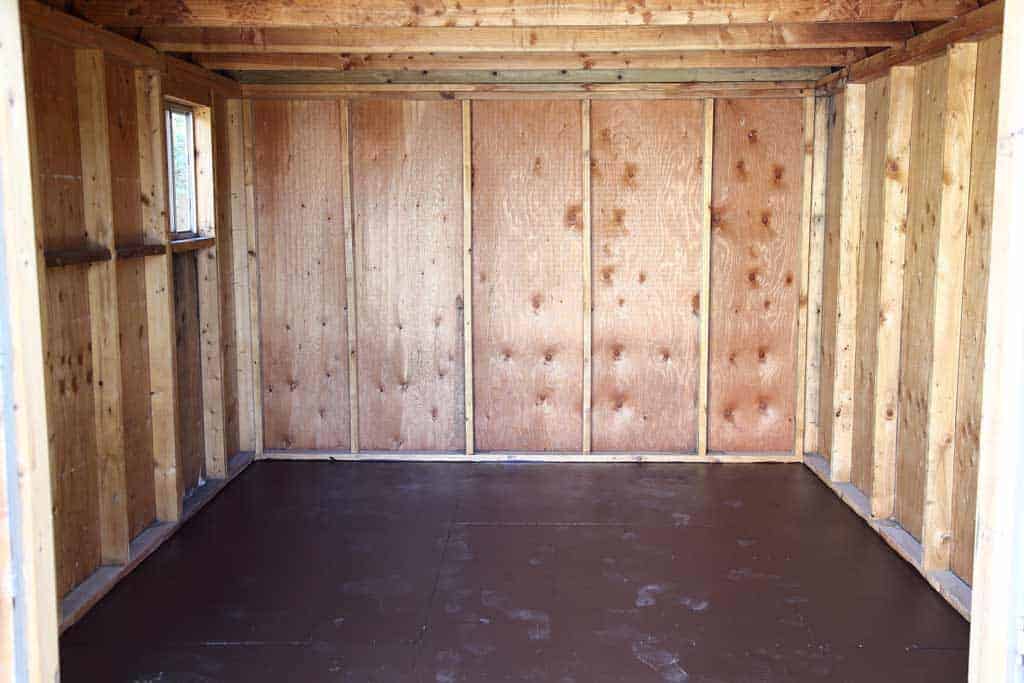
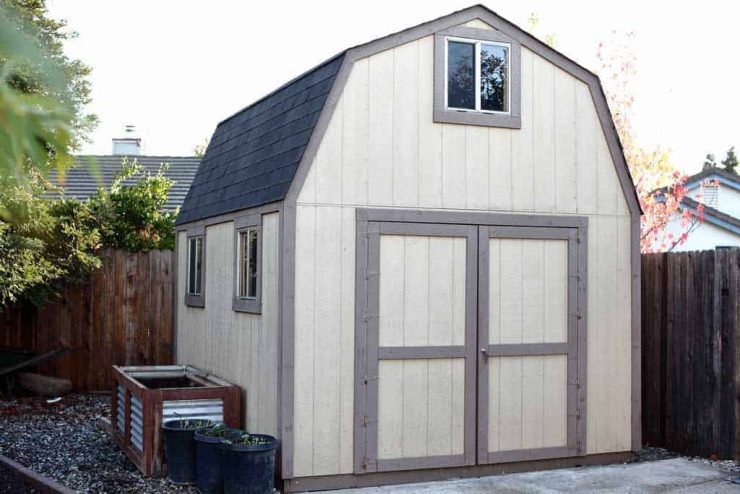
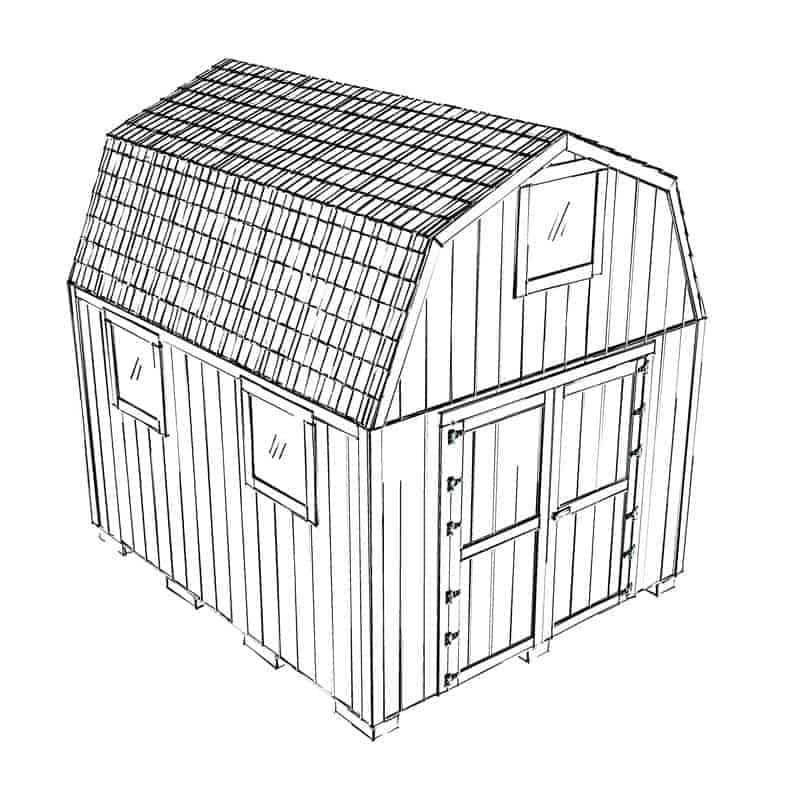
If you have stuff everywhere and you don’t know what to do with it or where to put it, instead of renting out a storage unit, consider adding an outdoor shed. That extra storage space could help you declutter your home, clean up the yard, or even use it as a small workshop. You can either buy the shed or save money by building it from scratch. If you’re looking to build it, I created step-by-step plans on how you could build your own custom Two-Story 10×12 DIY Shed.
Things to Consider Before Building a Shed
Before you begin building your shed, there are a few things to consider. If you rush the planning phase, you might end up with something that looks like a shed but doesn’t act like a shed. A shed is a handy structure; however, if it doesn’t serve your needs, you’ll be constantly frustrated.
Here are the most important things to consider before you build your shed:
- Area Building Codes and Guidelines
- The Shed’s Purpose
- The Foundation
- Your Local Weather
Zoning Codes and Permits for Sheds
There are several kinds of shed permits. You will likely need a building permit for sheds with electricity or a permanent foundation or if larger than a specific size.
However, even if you’re just building a small shed without any fancy lighting or foundations, you may still need a planning permit.
Planning permits (or perhaps just zoning requirements, depending on your area) will regulate where your shed can be placed. Some areas will have easements for utilities, requirements for how far the shed can be from other buildings/fences, and information on the presence of underground utilities.
For many areas, the cut off for a building permit is around 120 to 200 square feet. However, we cannot stress enough: every area differs in requirements for sheds.
To be sure your shed is built and placed correctly, check your local rules and regulations. This helps guarantee you won’t need to move or deconstruct your shed in the future.
Consider the Purpose of Your Shed
Sheds can perform many tasks. Some people just need extra storage space. Others want a small workshop, a place to shelter animals, or a backyard getaway. Whatever your needs, there is a shed for you.
Here are some things to consider regarding your shed’s purpose.
First, if the shed is meant for storage, what will you be storing? If you just have some non-perishable tools, like shovels and rakes, any standard small shed will probably do.
However, if you’ve got a riding lawnmower or other large lawn tools, you may need a bigger shed, one with a small garage door, or a set of large double doors.
You can equip some sheds with electricity and heaters. These are ideal for people who want to spend some time in their shed.
Use this shed estimation tool to determine the best shed for your needs.
When it comes to a shed, don’t just think about your current needs; imagine what you’d like to do with it in the future. Build a shed that will grow with you and your hobbies.
Consider the Foundation of a Shed
The foundation is the most crucial part of any structure. Ultimately, the foundation will determine what type of shed you’re going to have.
Foundations fall into two basic categories:
- Permanent Cement Poured
- Non-Permanent Pre-made
Here’s the gist of it.
Permanent Cement Poured Foundation for Shed
By pouring a concrete pad or concrete piers, you ensure that your shed will stand the test of time.
Cement poured foundations keep your shed off the ground, prevent sloping and shifting, and hold the shed firm during storms.
Pouring your own reinforced concrete foundation is the platinum standard of foundations. When you take the time to do this right, you know you’re getting a structure that will last.
However, these foundations take longer to build, will likely require a building permit, and cost more than less robust structures.
You’ll need to weigh the options. If you only want a light shed to house some unimportant odds and ends, then maybe a poured concrete foundation isn’t for you. However, if you want your shed to last many years, take the time to pour concrete.
Non-permanent Pre-made Foundations for Shed
This category includes deck footers, wood skids, and concrete blocks. The non-permanent options won’t hold up like the permanent. However, there are a few reasons to go with this option.
First, if you don’t need a robust shed, why take the time to pour all that concrete. Second, you might plan to move from your current home. If this is the case, a non-permanent shed could be feasibly deconstructed and transferred to your new home.
Finally, some areas will not require a building permit for non-permanent sheds. However, check all codes in your area.
Consider Your Local Weather Before Building a Shed
If you’re in an area that gets torrential rain but very little wind or freezing temperatures, a quality resin shed with a non-permanent foundation will serve you well.
However, if you live in an area that gets freezing temperatures in the winter and windy weather year-round, then a permanent foundation will be the most practical option.
During the freezing temperatures, the ground will shift. If your foundation isn’t solid, your shed will shift with the ground, causing structural compromises.
Before you build anything, you’ll need to check with your city and county and be sure to follow all regulations. These guidelines will also help your shed stand firm in inclement weather.
You also might be interested in other organizational projects I created such as DIY Garage Cabinets, Mobile Tool Cart with Pegboard, and DIY Pegboard Wall.
Material List
- 2x6x12′ (x6)
- 2x6x10′ (x17)
- 2x4x12′ (x6)
- 2x4x10′ (x10)
- 2x4x8′ (x19)
- 4x4x8′ (x2)
- 1x4x12′ (x2)
- 1x4x8′ (x25)
- 8’x4′ – 3/4″ Plywood (x7)
- 2x4x6′ (x32)
- 4″x8″x16″ Concrete Blocks (x12)
- 8’x4′ – 3/4″ Siding Plywood (x14)
- 8’x4′ – 1/2″ Plywood (x8)
- 24×24 Window (x3)
- Door Hinges (x12)
- Door Handle with Lock and Keys (x1)
- Sliding Latch Lock (x2)
- Screws/Nails
Note: Lumber dimensions are listed as nominal size. See lumber sizes for actual dimensions vs nominal.
Disclosure: Some of the links on this page as well as links in “tools for this project” and “material list” sections are affiliate links.
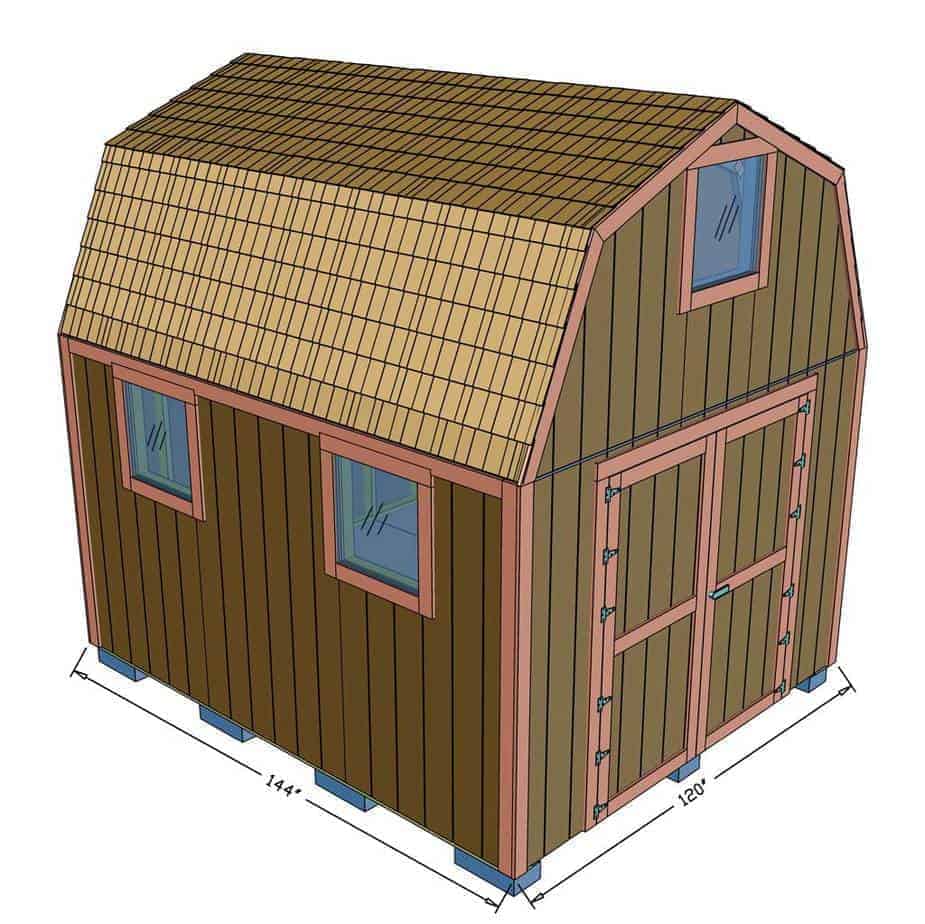
Dimensions
Step 1 – Level the Ground and Place the Concrete Blocks
There are several different ways of building the foundation for a shed. It all depends on how much money you want to spend. If you live in an area where it snows or windy your foundation might be different than in the area where the weather is not too harsh. You could find more information on the types of foundations here.
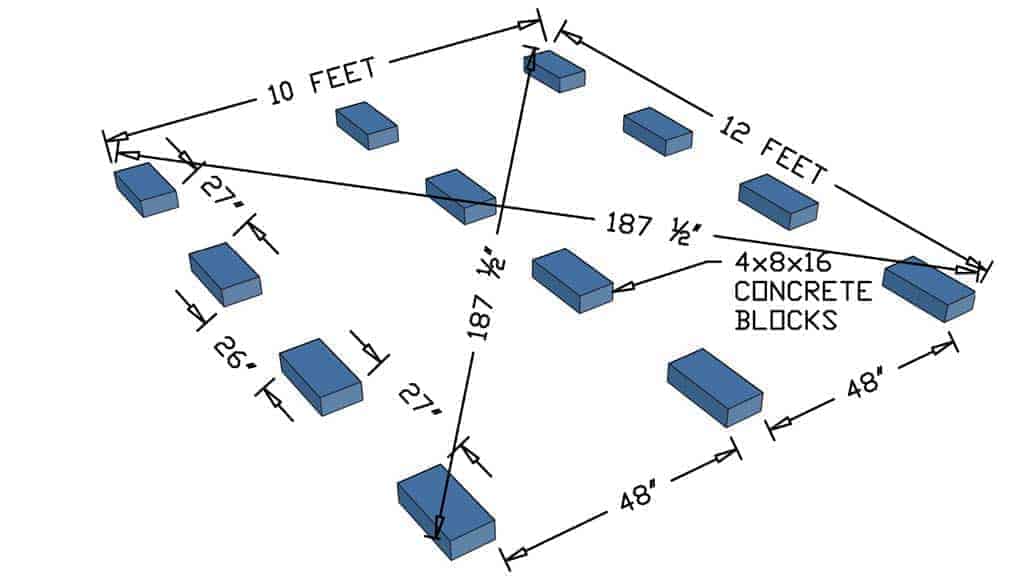
Since this shed was built in California where it does not snow, the foundation was made using solid concrete blocks. You could purchase these blocks at your local hardware store such as HomeDepot. This foundation method is fairly straight forward, inexpensive, and doesn’t require much dirt-digging.
First, level the ground to eliminate any slopes and high/low areas. Then take 4x8x16 concrete blocks and lay them out per provided dimensions. Pull a measurement diagonally from four corners to check if dimensions are the same. This will ensure that foundation is perfectly squared. Use a string or a straight board to make sure all blocks are leveled at the same height.
Step 2 – Place 2×6 Boards on the Concrete Blocks
To prevent the foundation from prematurely rotting due to moisture in the ground, it’s a good idea to use pressure-treated wood. This wood is treated with chemicals to resist moisture and prevent decay.
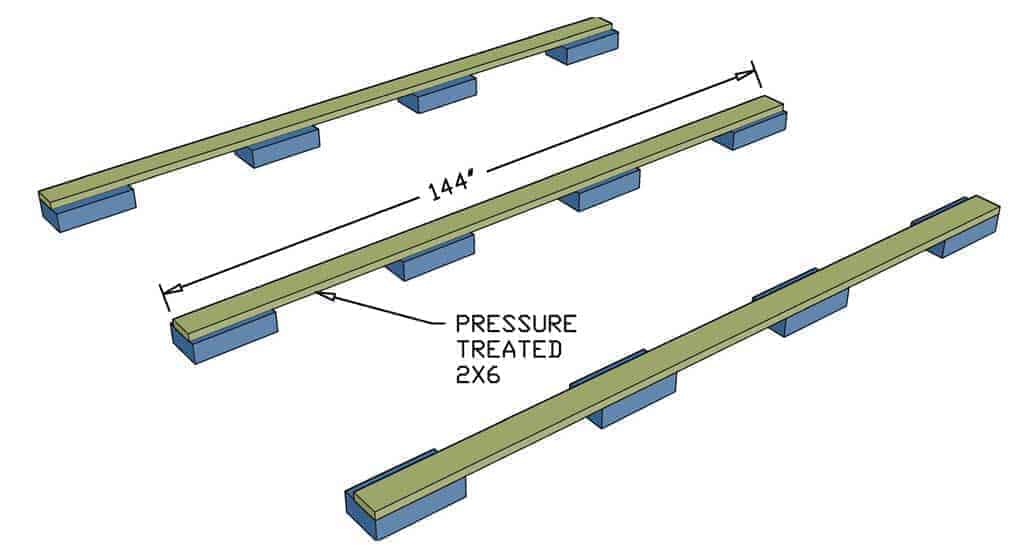
Take pressure treated 2×6 boards that are 12 feet long and place them flat on the concrete blocks as shown in the picture. Since the concrete block is 8” wide and 2×6 is 5 ½” wide move the side boards to the outer edges of the blocks and the 2×6 in the middle of the foundation, align it in the center of the blocks.
There are several reasons for these 2×6 boards.
First, it spreads the load of the shed evenly on the concrete blocks.
Second, the foundation frame boards will have the same span distance. For example, see the diagram in step 3. If you eliminate the boards that lay flat on the concrete, then some of the foundation fame boards will land on concrete blocks and some will not. So the boards that do not land on the concrete block have a much longer span and will bow down overtime. This will eventually make some areas of the floor lower and some higher.
The third reason is that you do not need to install Simpson Strong-Tie Joist Hangers on each foundation frame board due to these flat 2×6 boards on concrete blocks.
Step 3 – Build a Foundation Frame for the Shed
The foundation frame is also built with pressure-treated wood due to its proximity to the ground and exposure to moisture.
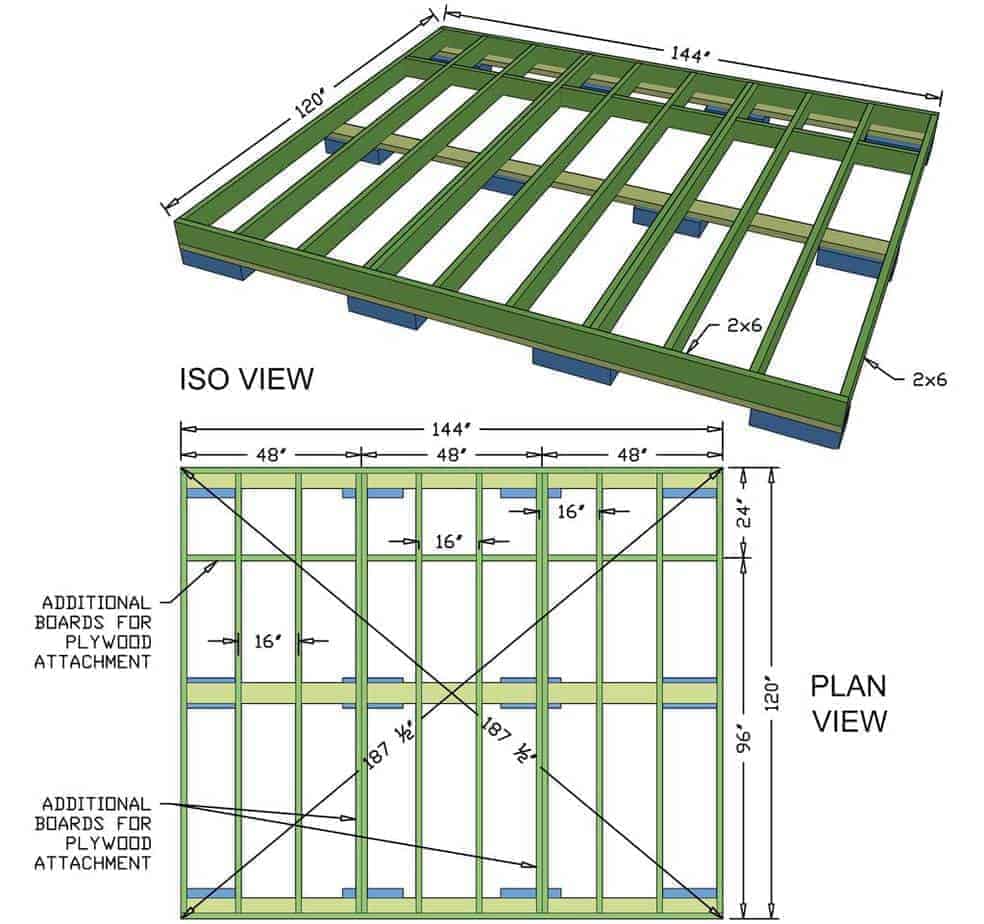
Take two 2×6 boards that are 12 feet in length and place them on top of the 2×6 boards that are lying flat on concrete blocks. One board will be on the outer left edge and the other board on the opposite side. Then these 12 foot long boards will be connected together with perpendicular 2×6 boards that are placed 16” apart. Attach these perpendicular 2×6 boards with nails or 2 ½” deck screws.
Similar to step 1 pull a measurement diagonally from four corners to make sure the distance is the same.
Once the perpendicular boards are attached, you’ll need to add additional 2×6 boards for plywood, because the plywood typically comes in 4’x8’ sheets. See step 4 diagram for the plywood layout.
When placing plywood on the foundation framing, all four edges of the 4’x8’ plywood needs to land on a 2×6 board. If plywood does not land on a 2×6 board then there is nothing to screw it into. This will make the plywood bow down or break off over time.
Step 4 – Cover Foundation Frame with Plywood
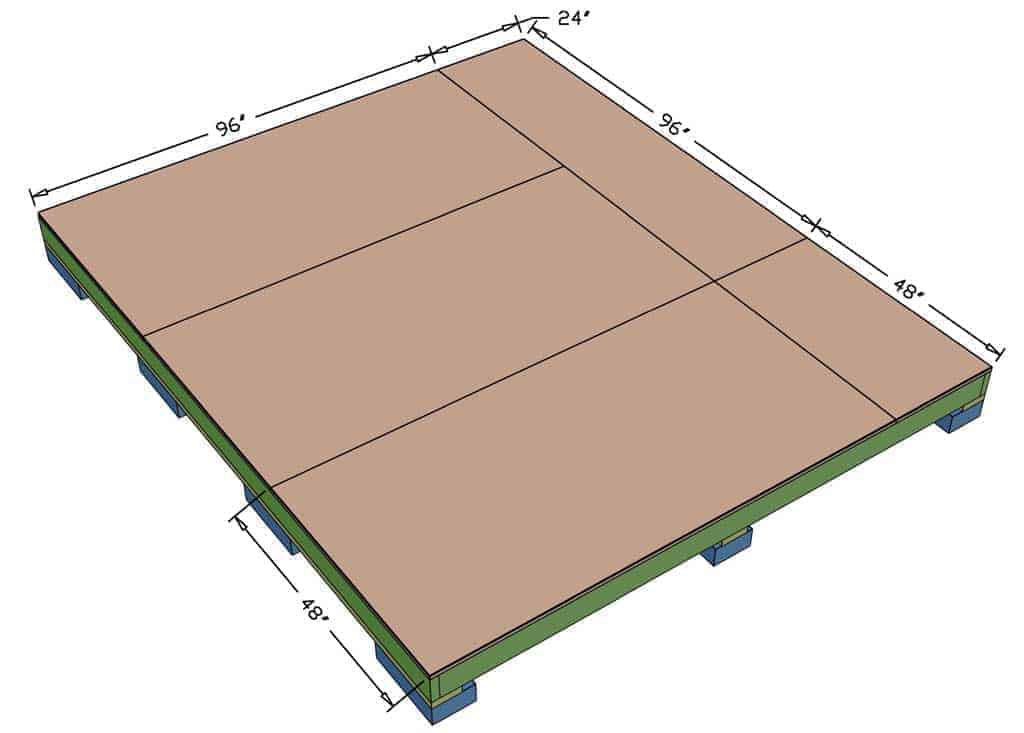
Once the foundation frame is complete and everything is squared off, then cover it with plywood. If step 3 is done correctly then all edges of each plywood would land on the board. Use 1 ½” wood screws to secure the plywood to the framing. Follow the diagram in this step for plywood configuration.
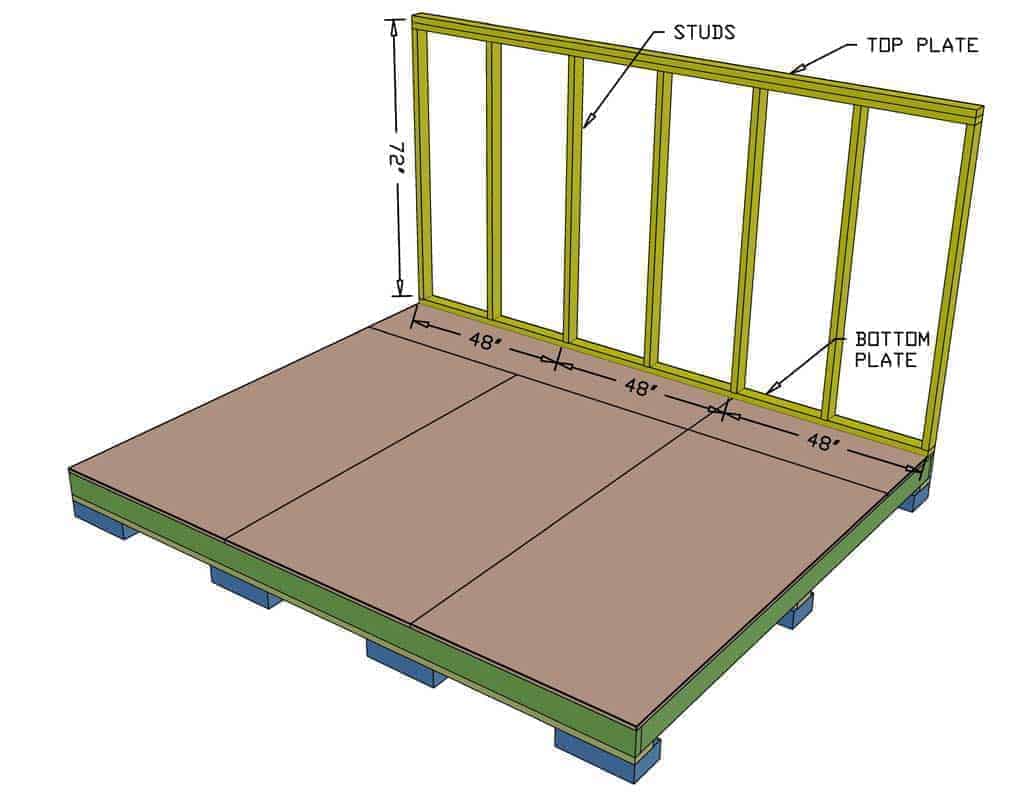
Step 5 – Build the Right Side Wall
Now it’s time to build the walls. We’ll go over each wall in a separate step because they are all different.
Whether you’re framing a big house or a small shed, each wall consists of three basic things. The wall should have a top plate, a bottom plate, and studs.
Start by building the wall flat on the floor, then when it’s finished you could raise it up and attach it to the foundation.
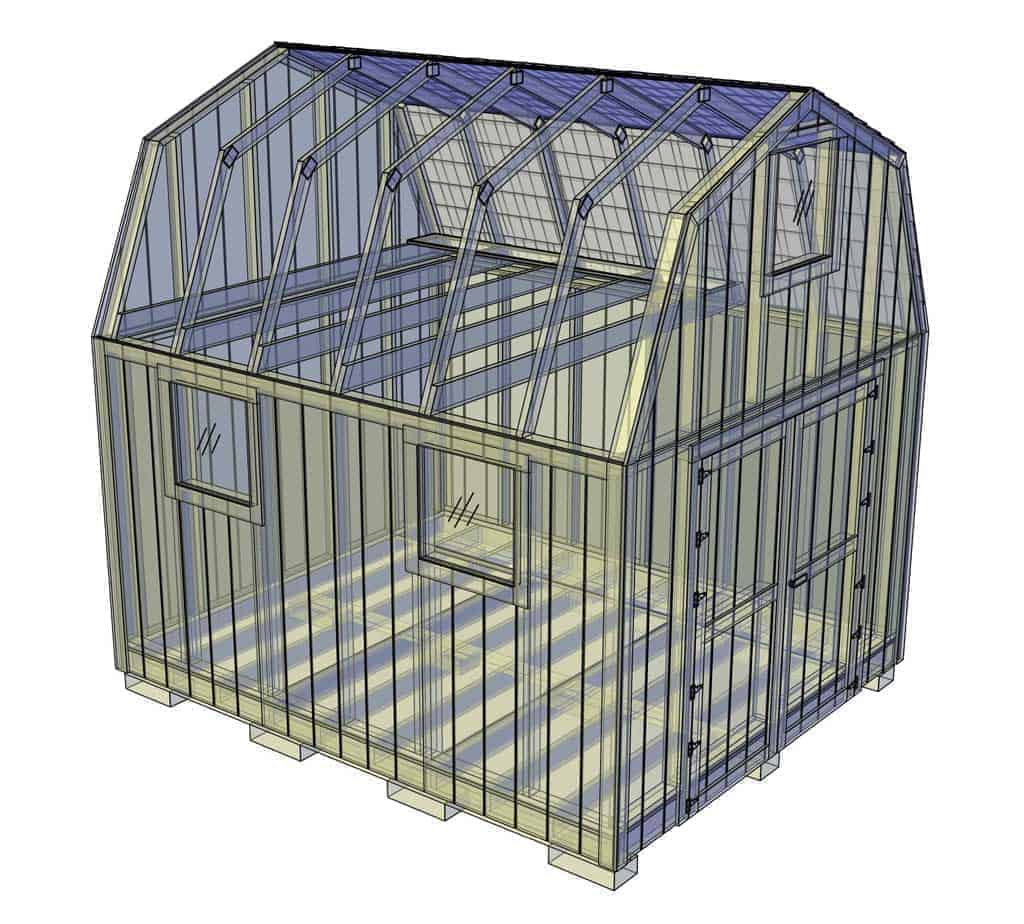
Take one 12 foot long 2×4 and place it on the floor to be used as a bottom plate and another 12 foot long 2×4 for the top plate. The bottom and top plates need to be joined together with studs that are 72” in length. Each stud needs to be spaced 24 o.c. (on-center = from center of stud to center). You could use nails or screws to attach studs to the top and bottom plates. Then take additional 12 foot long 2×4 boards and attach it to the top plate. So the top plate should have double 2x4s on top. Once the wall is complete, raise it up and place it on the right side edge of the floor. Secure it with screws to the floor.
Step 6 – Assemble the Left Side Wall
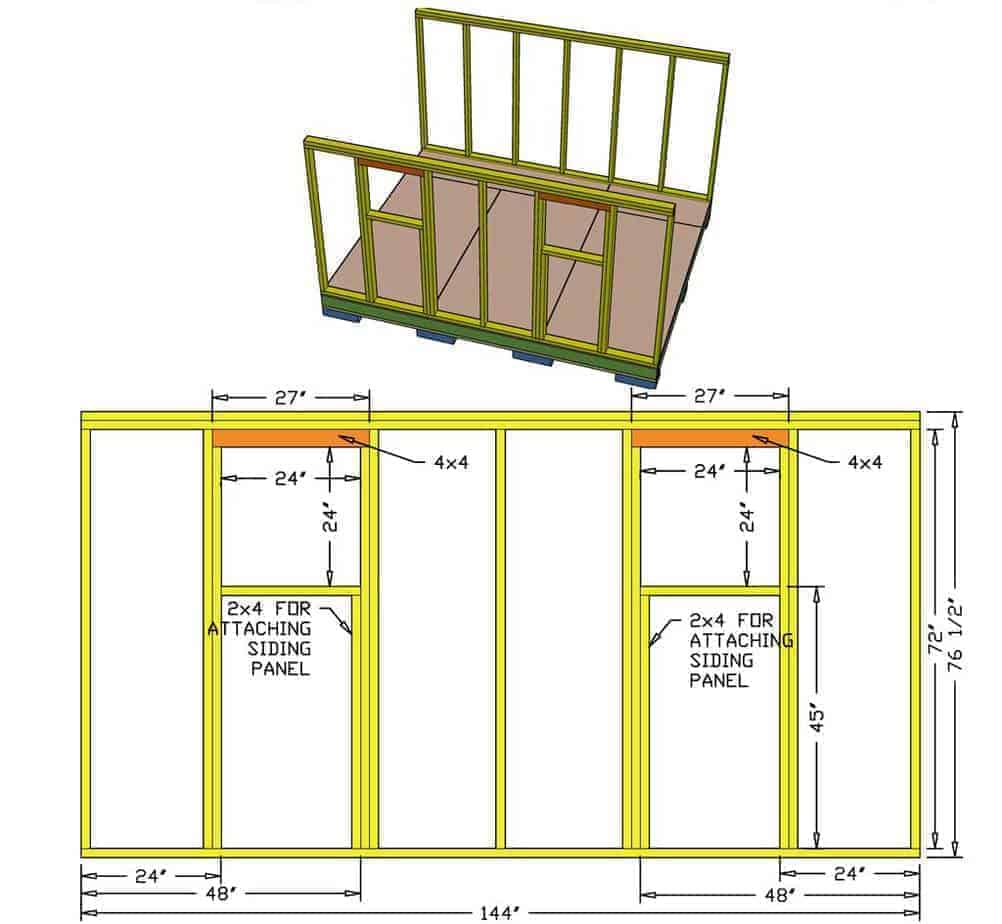
Building the left side wall is very similar to the right wall but with additional framing around the windows.
Again using 12 foot long 2×4 for top and bottom plates, attach them together with studs. If you’re planning to use siding plywood panels that are 4’x8’, then you need to keep in mind that the siding panels need to land on studs for attachment. See diagram measurement for the stud layout.
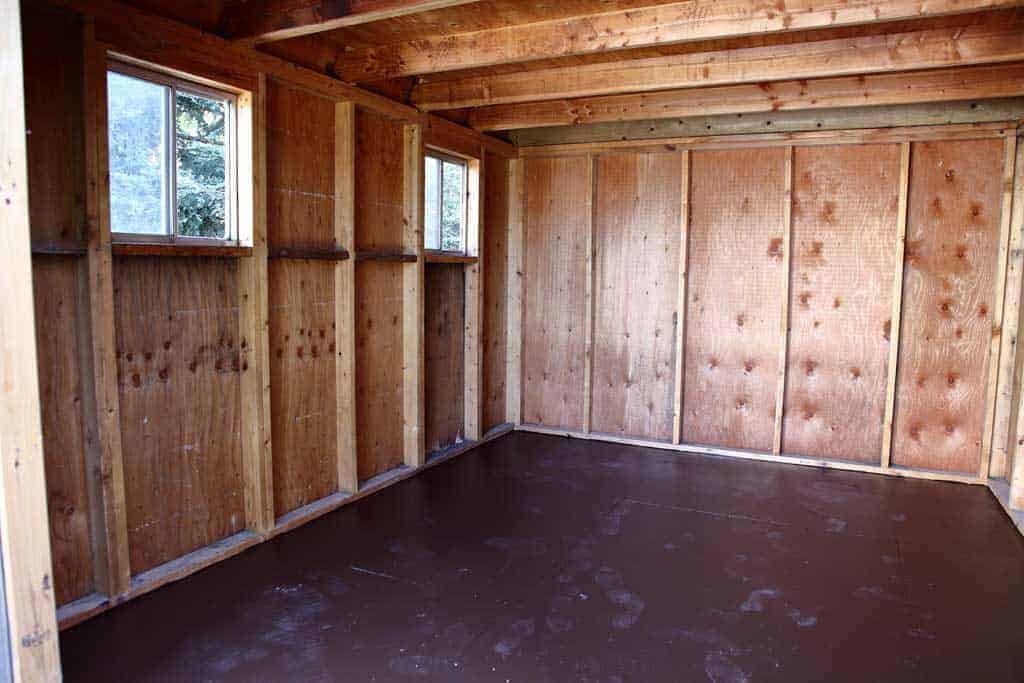
For this shed, we’re using a 24×24 window (the actual window is slightly smaller to fit in a 24×24 wall opening). Each window and door framing should have a header. The intent of the header is to spread the load to the studs instead of putting pressure on the window itself. Since the roof is not that heavy on the shed, compared to the house, using a 4×4 header should work just fine. Once the wall is complete, raise and attach it to the floor.
Step 7 – Install the Back Wall of the Shed
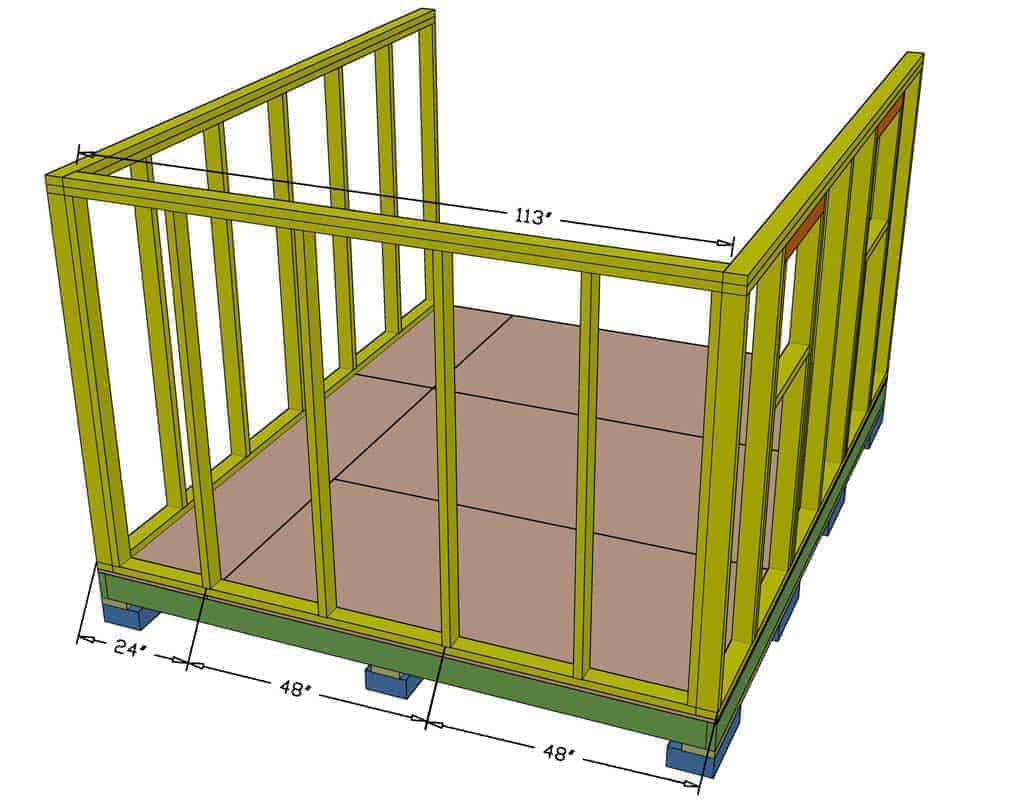
Measure the distance between the left and the right wall and cut 2x4s to those dimensions for the bottom and top plates. Attach the studs 24” o.c. and install the wall in place. Once the wall is attached to the floor, make sure that both the left and right walls are also secured to the back wall.
Step 8 – Assemble the Front Wall
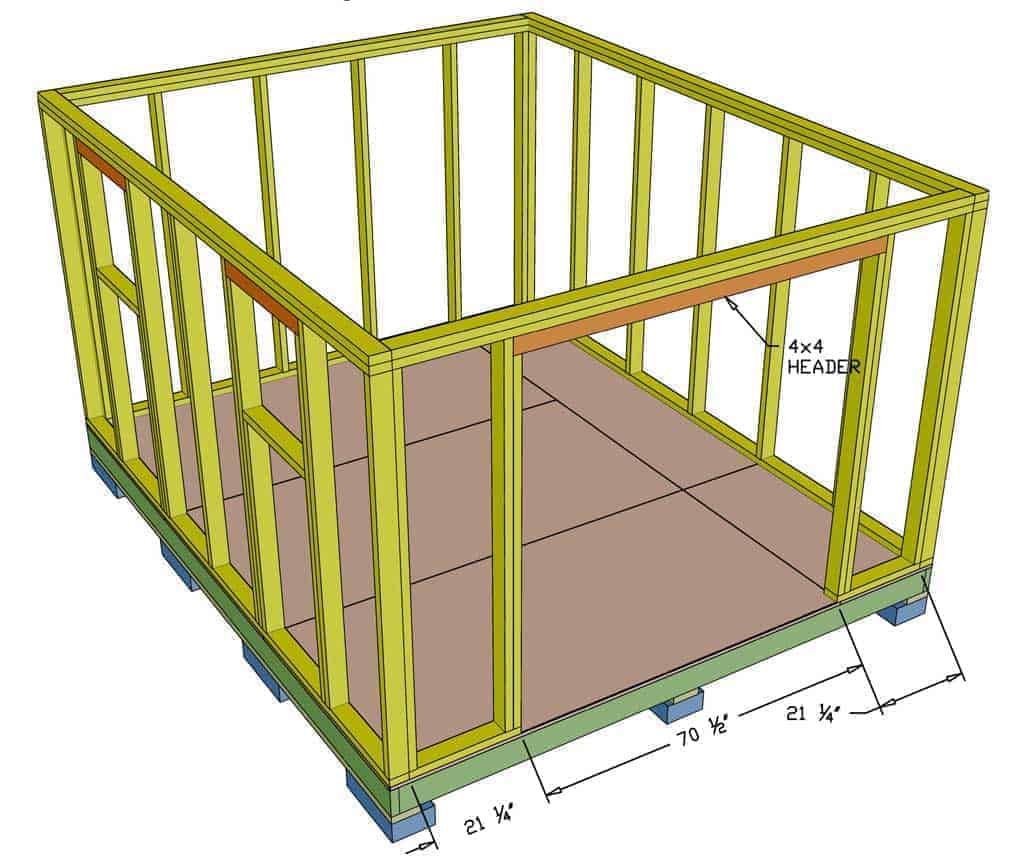
Similar to the back wall, measure the distance from the side walls to determine the exact length of the top plate. Because of a large opening in the center of the wall for double doors, the bottom plate will need to be split into two pieces that are 21 1/4” in length. The 70 1/2″ door opening section does not require a bottom plate; however, you will need to install a 4×4 header above the door just like with the windows. See the diagram for exact measurements.
Step 9 – Construct and Attach Front and Back Roof Trusses
Now it’s time to build the roof trusses using 2x4s. First, start with building a truss at the very back of the shed and then the truss in front, above the double doors. These two trusses have the 2×4 boards positioned flat, compared to the rest of the trusses in the middle that are positioned upright.
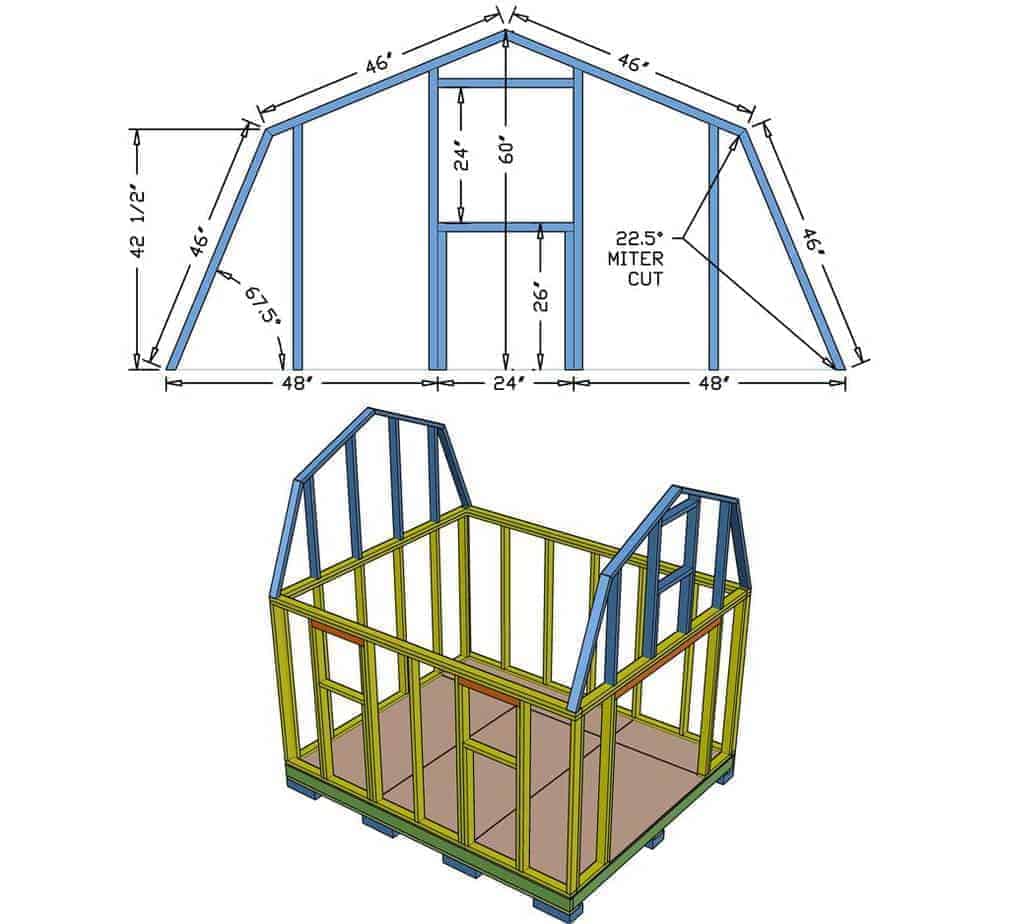
Each roof truss consists of four 2×4 pieces that are cut to 46” in length with a 22.5-degree miter cut on both ends. Build the truss flat on the floor and then raise it up in place.
Take the four 46” boards and connect them together at the angle of the miter cut as shown in the picture. Next, we need to add vertical 2x4s in this truss for siding attachment. These 2x4s need to be 24” apart just like a regular wall. Now lift up the truss framing and attach it to the back edge of the shed above the back wall.
The front truss is very similar to the back truss, but with an additional frame around the 24×24 window. See the diagram with exact dimensions.
Step 10 – Build and Install the Remaining Middle Trusses
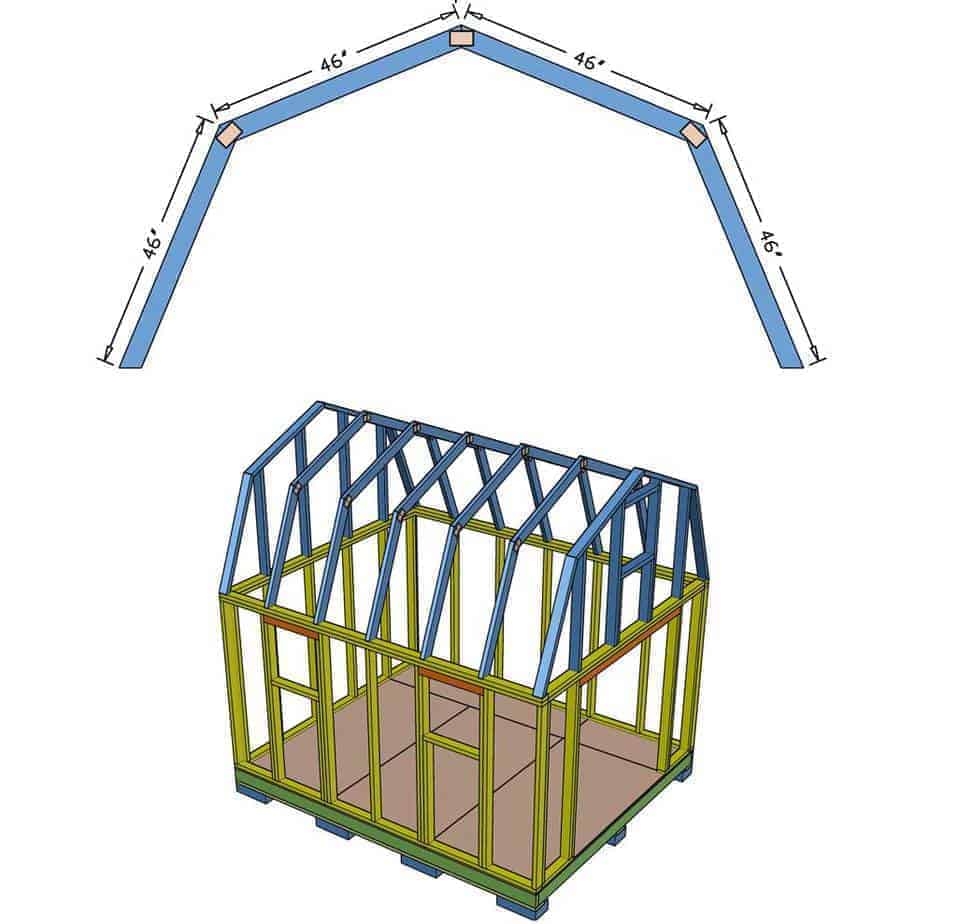
The remaining trusses have the same dimensions and angles as the front and the back trusses, but the 2x4s are positioned upright instead of being flat. Instead of using screws or nails to hold the truss together, use the Simpson Strong-Tie mending plate on both sides of 2×4 connections. Make sure that all trusses are built exactly the same height and width. This will ensure the plywood on the roof will lay flat without any high/low areas.
Now, spread out the trusses 24” apart and attach to the top plate of the side walls.
Step 11 – Install Second Floor Framing
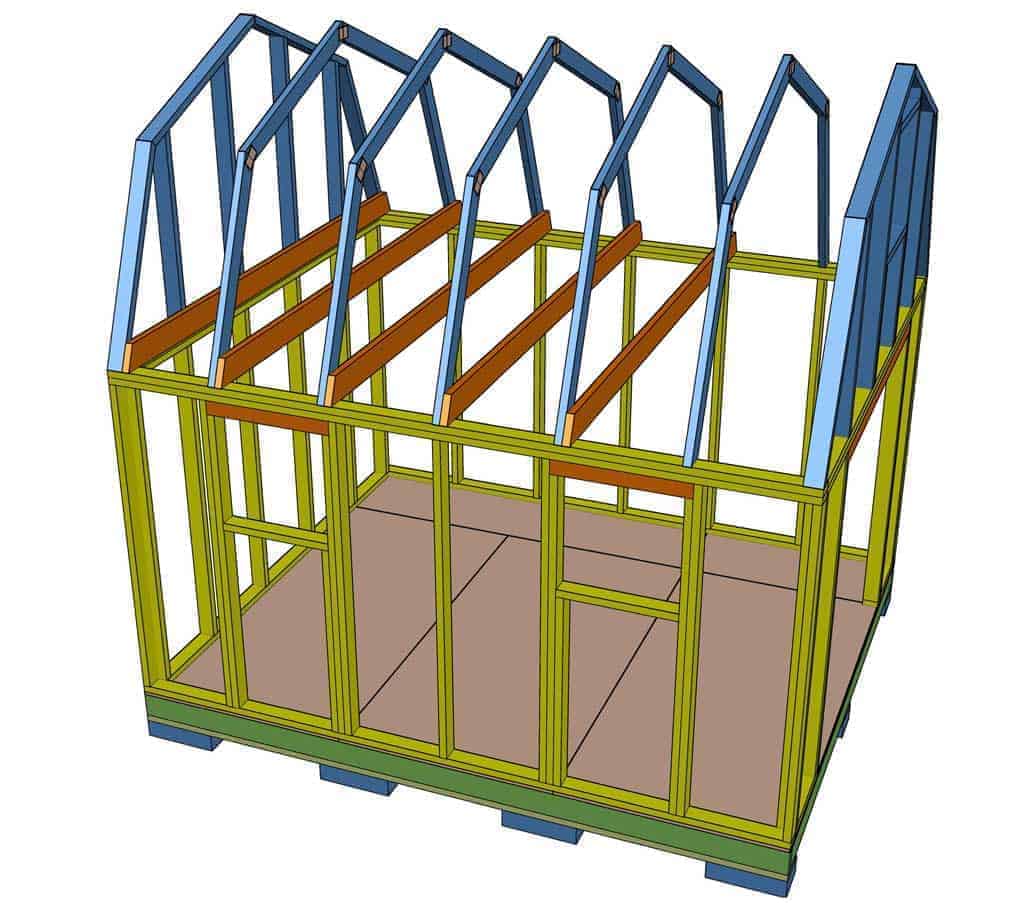
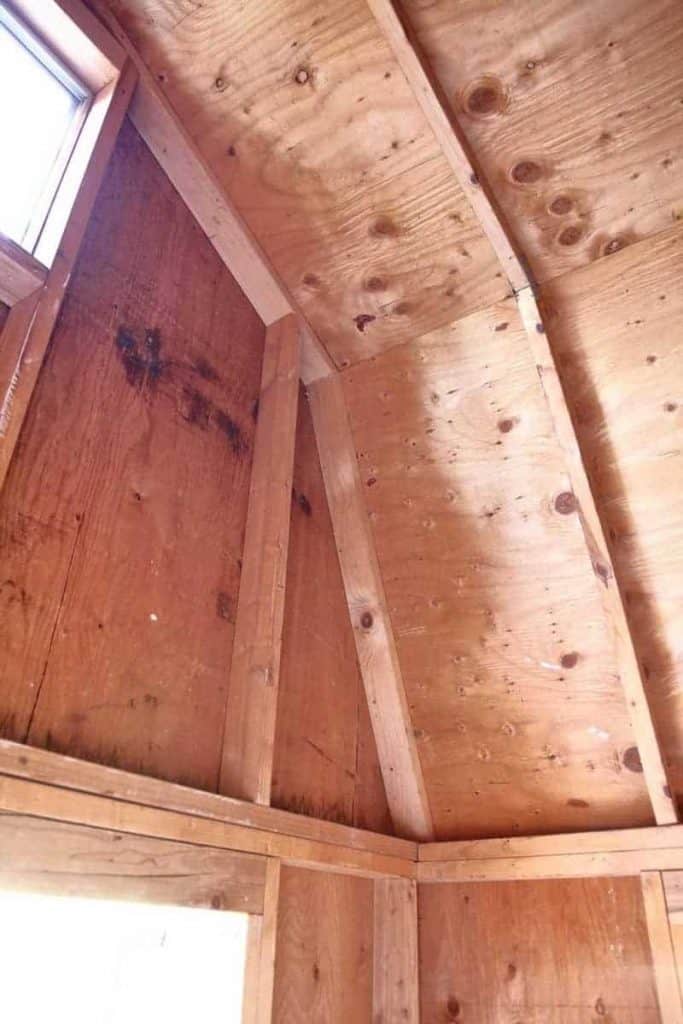
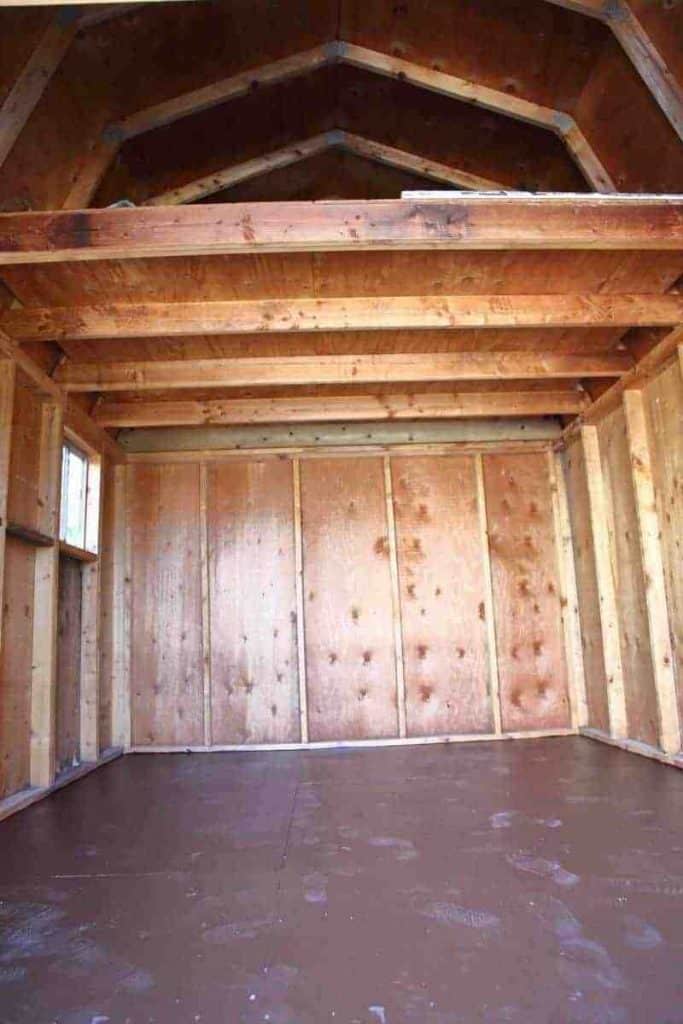
Once the trusses are installed, take five 10 foot long 2×6 boards and cut the ends to 22.5 degrees. Then place these boards on the top plate of the side walls against the trusses. The second-floor framing boards should be 24″ apart and attached to the trusses.
Step 12 – Cover the Second Floor Framing with Plywood
When covering the second floor with plywood, you need to either use tongue and groove plywood or install additional framing blocks if using regular plywood. Tongue and groove plywood interlocks with each other and will prevent it from sagging at the edges. Regular plywood will require blocking along the edges for plywood to attach to. Use 1 1/2″ wood screws to attach the plywood to framing.
Step 13 – Cover the Roof with 1/2″ Plywood
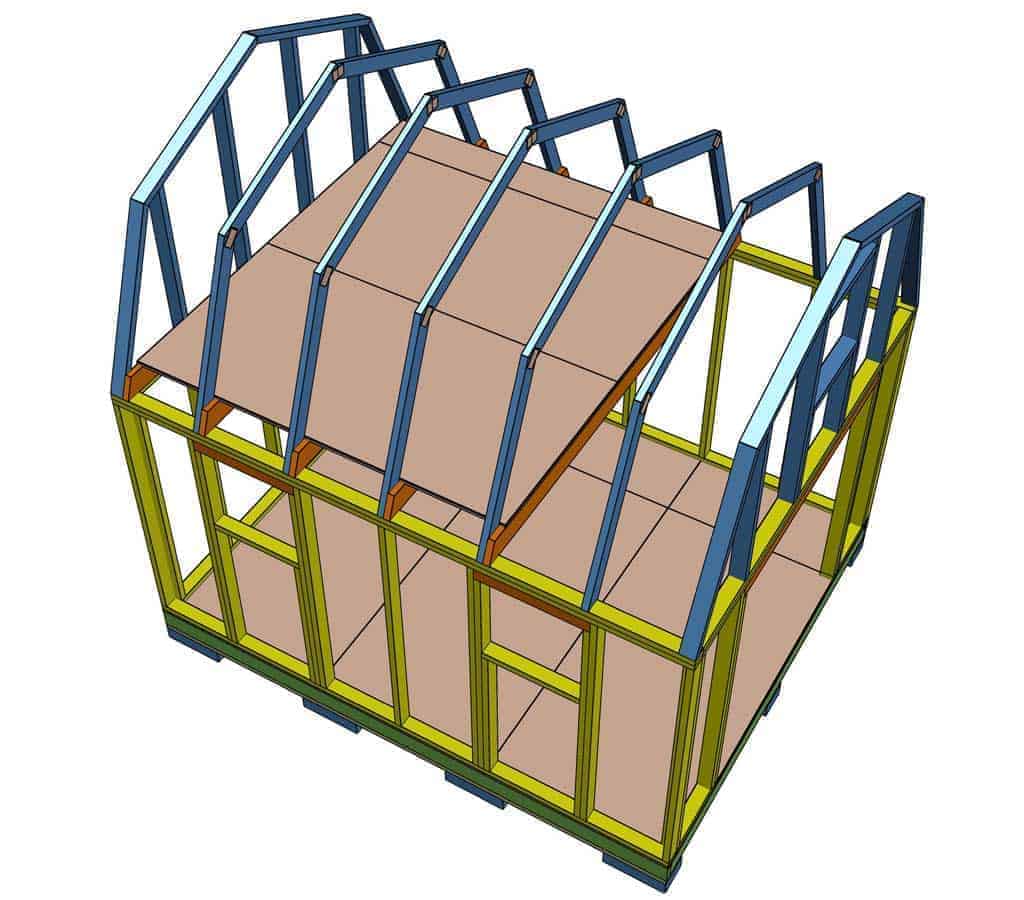
Use 1/2″ plywood to cover the roof trusses. To keep the roof trusses firm, stagger the plywood sheets on the roof. This will keep the trusses from sliding apart or moving closer together.
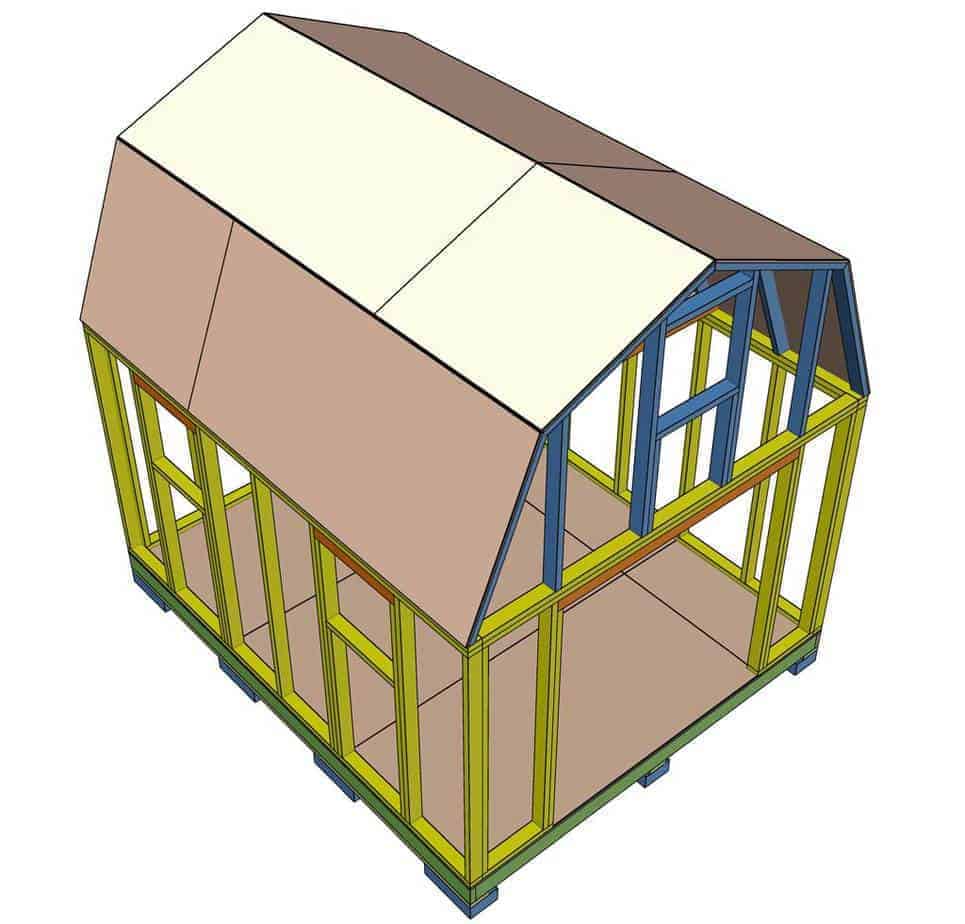
Step 14 – Install Windows and Plywood Siding Panels
Take the 24×24 window and slide it inside the opening in the wall. Then secure it with screws to the framing around the window.
Next, install the 4’x8′ siding panels around the shed. If you live in an area where it snows or rains a lot, then it’s a good idea to wrap the shed with house wrap paper. This will protect the shed from cold, dust, moisture, and heat. Since I live in an area where it’s dry and sunny most of the year, the paper wrap is not necessary.
When installing the siding panels, similar to any plywood, the edges need to land on wall studs for attachment. If the siding does not land on studs, simply add a 2×4 stud at that location.
Cut the 4’x8′ siding panels as shown in the cut list. Typically all siding plywood sheets are made to overlap each other to protect from water getting inside the shed.
Siding around the front double doors needs to be cut shorter 3/4 of an inch on top and sides. This ¾” gap will be compensated with the siding and trim on the double doors (see step 17 and 18 for door installation). Once the doors are installed, you should not see any daylight around the edges.
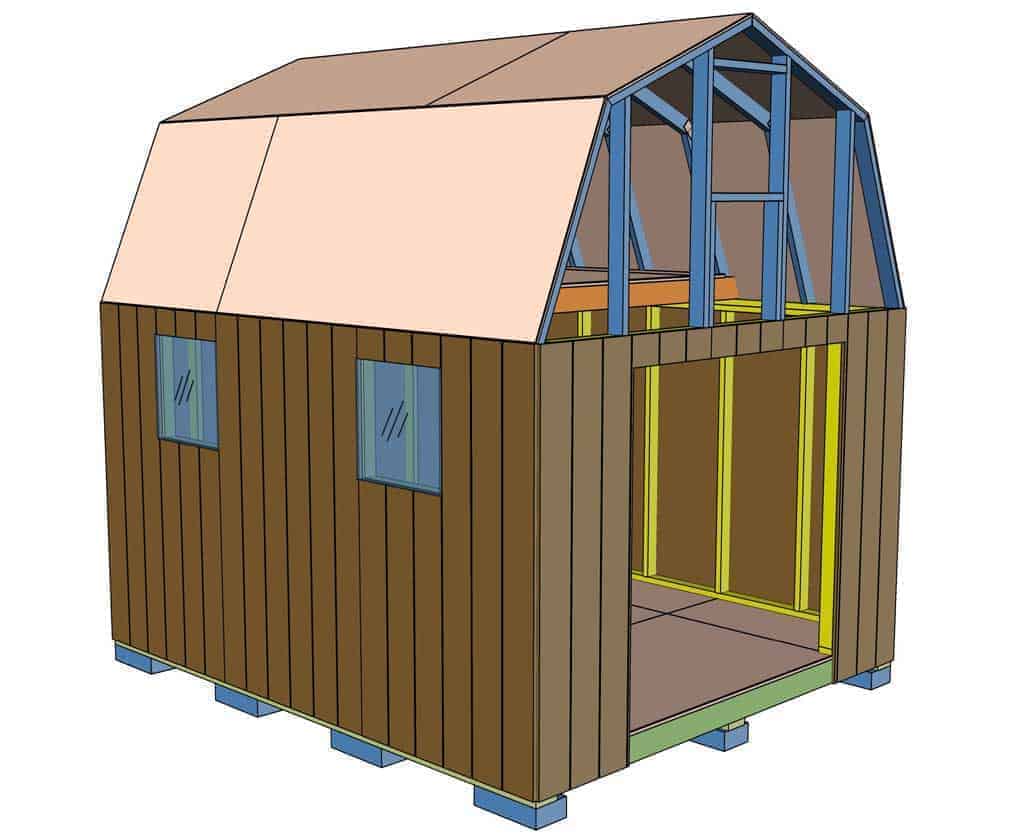
Step 15 – Finish Installing the Upper Section with Siding Panels
Once the lower siding around the shed is installed, take 1″ x 3/4″ x 1″ z-flashing and place it on top of the siding, on the front, and the back walls. This z-flashing will prevent water from getting inside the shed where the lower and upper siding panels meet.
First, install the upper window and then finish attaching the siding. See the cut list for additional siding dimensions.
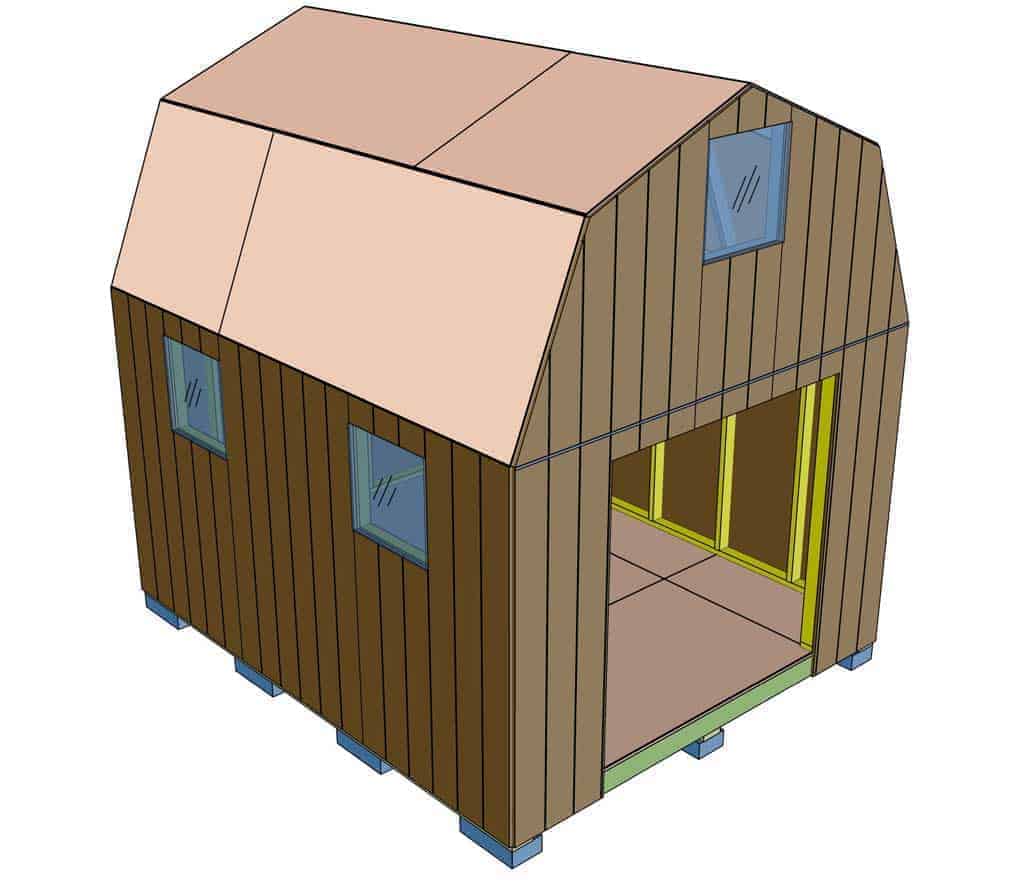
Step 16 – Add Trim Around Doors, Windows, and Corners of Shed
Use 1×4 boards to install trim around the doors, windows, and corners of the shed. Once the trim is installed, use outdoor caulking to seal any gaps around the trim.
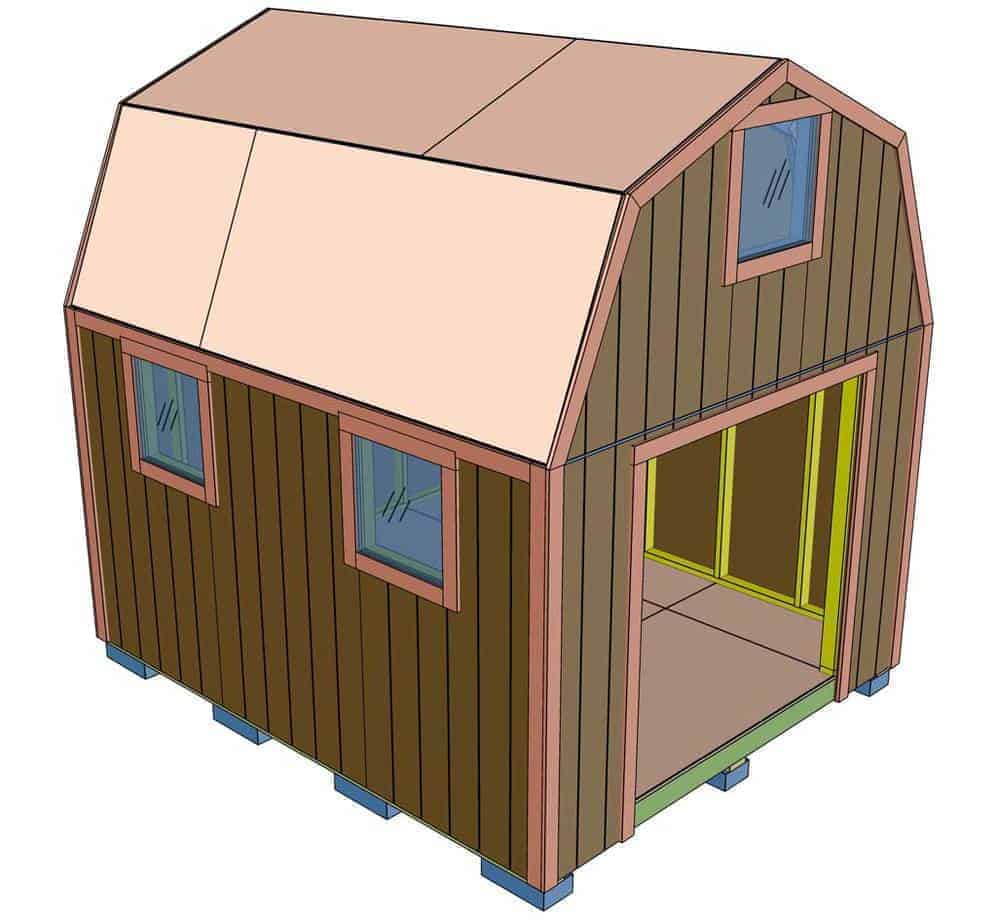
Step 17 – Wrap the Roof with Roofing Paper and Shingles
Start by placing the roofing paper at the bottom of the roof and staple it to the plywood. Then work your way up to the ridge of the roof. Overlay the roofing paper by 6″.
Once the roof is wrapped with roofing paper, then cover it with shingles. Again start from the bottom working up to the ridge.
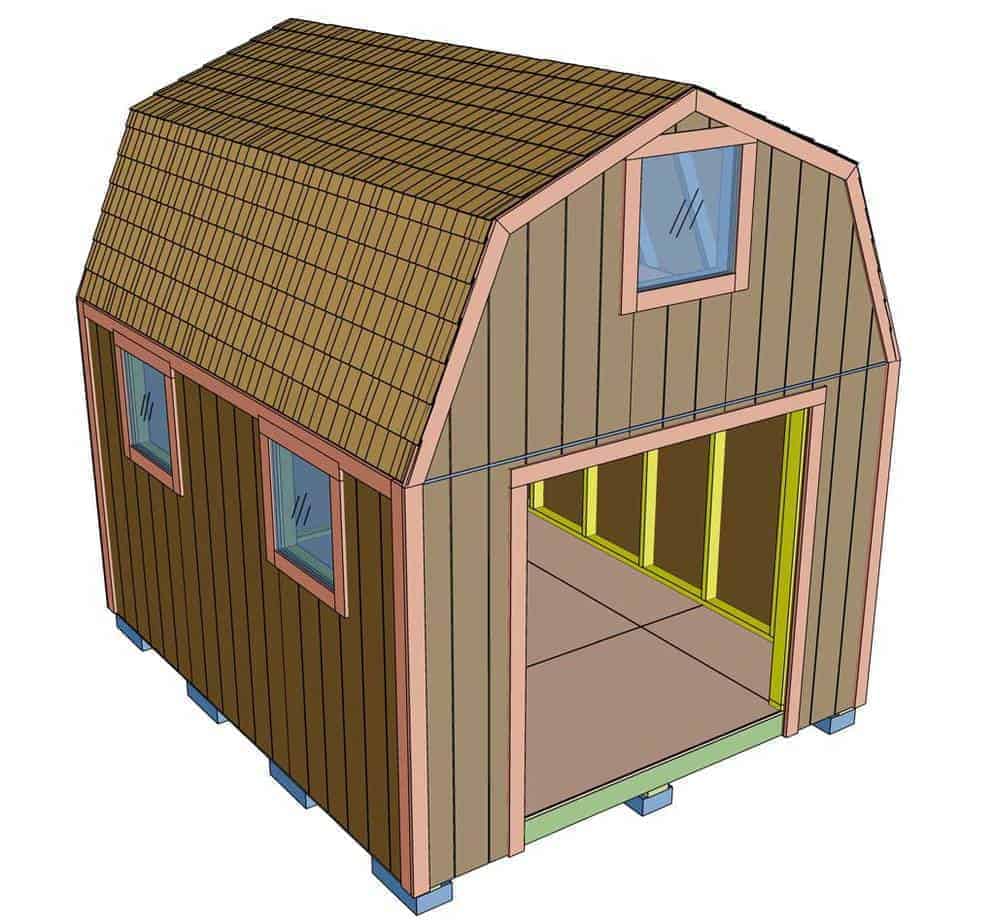
Step 18 – Build the Frame for the Double Doors
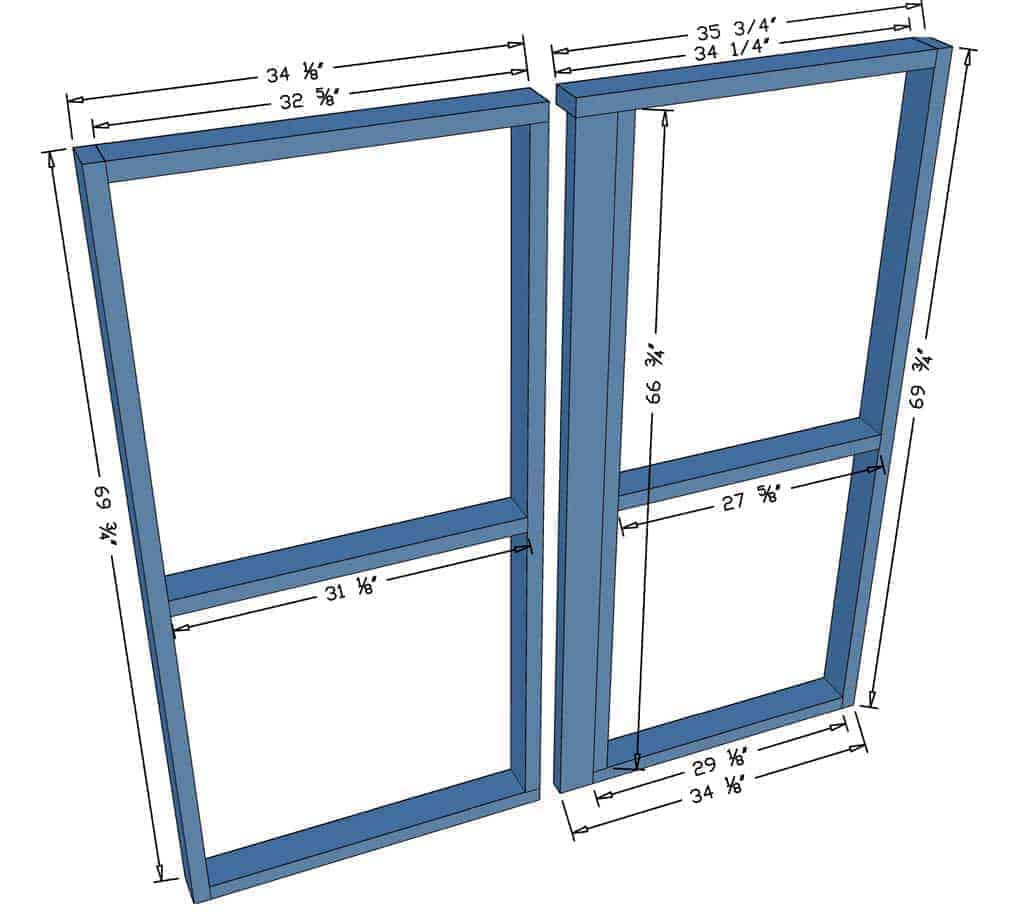
The inside of the door is made with a 2×4 frame that is covered with plywood on the back and siding/trim on the front. For the door to easily open and close the frame needs to be smaller than the wall opening. There should be a 1/4″ gap on all four sides of each door.
Follow the dimensions in the diagram to build the door frame.
Step 19 – Finish Double Doors with Siding and Trim
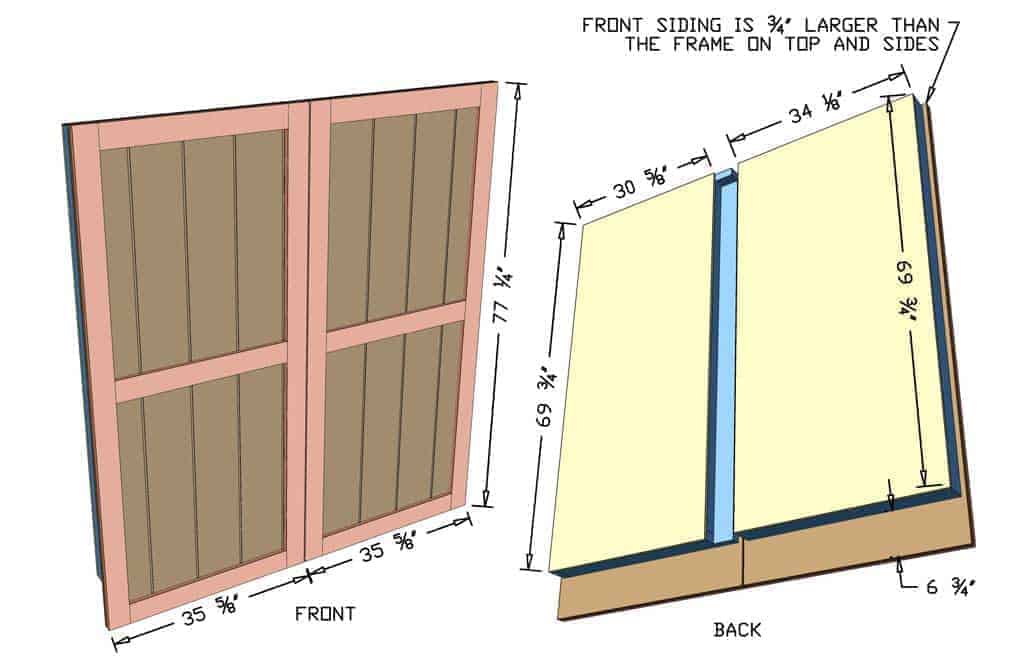
Cover the backside of the door framing with ½” plywood. This will make the framing stronger and prevent it from sagging.
Next, cut the siding plywood to the provided dimensions in the diagram and attach it to the frame. The siding needs to be slightly larger than the frame to cover the gaps between the door and the wall framing.
After attached siding, cut and attach 1×4 trim around the edges and one board in the middle of the door.
Step 20 – Install the Doors
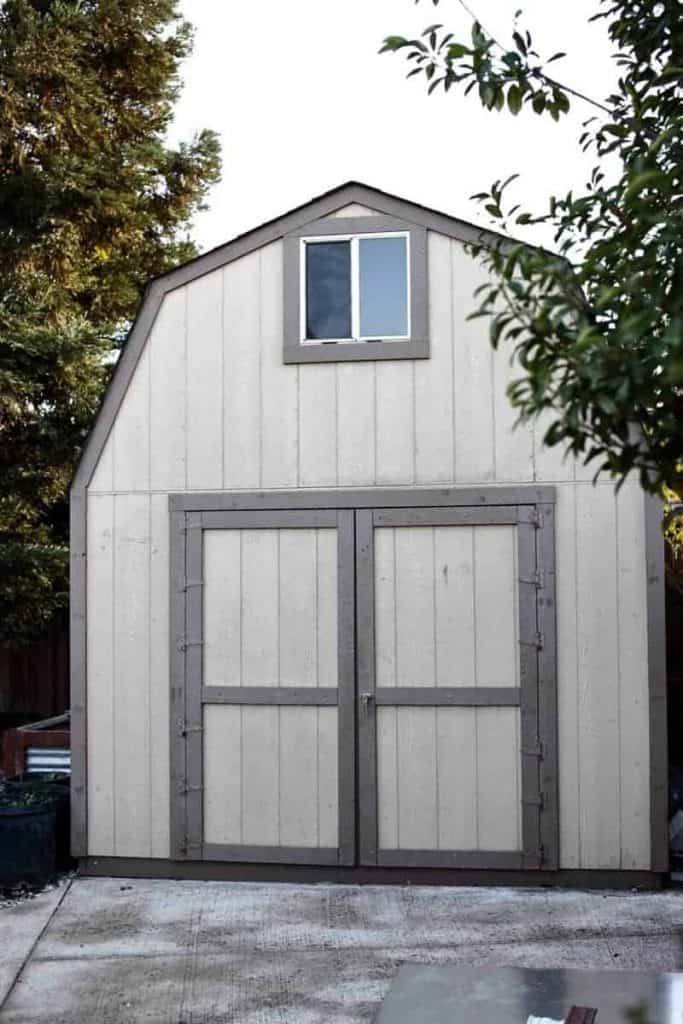
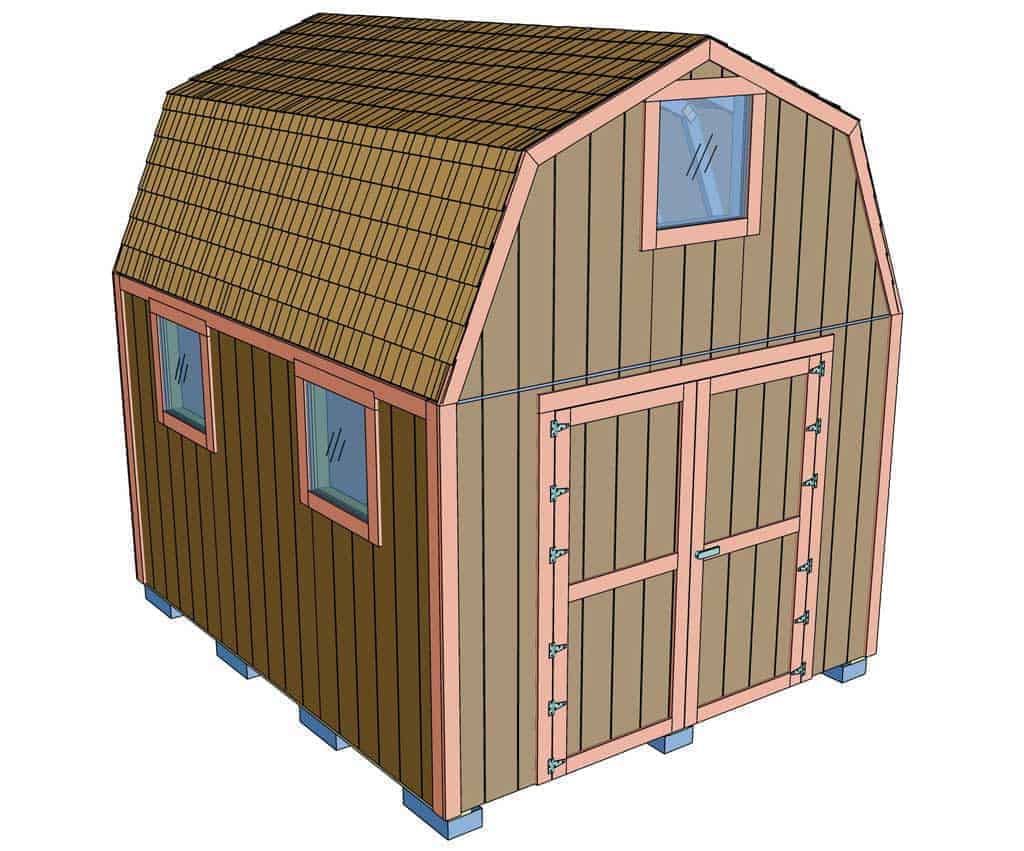
Since the doors are very heavy, use 6 hinges per door. This will spread the door load among the hinges. Now install the door handle with a lock on the right door. The left door will have a slide latch lock on the bottom and top. You are done with the Two-Story 10×12 DIY Shed.



Add comment